Blog

  • Encrypt an existing Linux installation with zero downtime (LUKS on LVM)

    Encrypt an existing Linux installation with zero downtime (LUKS on LVM)

    During the bi-yearly review of my setup, I realized I was running a Linux machine without full disk encryption. The encryption of the disk needed to be done ASAP, but I was not willing to reinstall the whole operating system to achieve that.

    Solution? I came up with an interesting way to encrypt my existing Linux installation without reinstalling it. And with zero downtime too: while I was moving my data and encrypting it, I was still able to use my computer productively. In other words, the process works on the fly!

    Requirements

    There are three requirements for this guide:

    1. The Linux installation already lives in an unencrypted LVM setup
    2. Some space to store your data (in another partition or on an external disk) with equal or more capacity than the LVM partition you are trying to encrypt
    3. Do a backup of the hard drive and store it somewhere (another disk, NFS, S3… I suggest using Clonezilla for this purpose). And don’t forget to test your backup.

    Initial situation

    As a starting point, let’s visualize the partitions of my hard disk:

    The interesting part is the red one: the root volume of the Linux operating system. Windows is already encrypted with BitLocker, so these two partitions should not be touched.

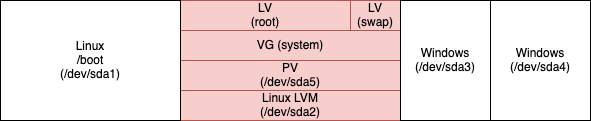
    /boot will remain a separate partition for the time being (we will discuss it later).

    After we will be finished, the resulting hard disk layout is referenced as LVM on top of an encrypted LUKS encrypted partition.

    Install the required tools

    Since I am already using LVM, the only package I am missing is cryptsetup: find it in your distribution repositories and install it.

    Encryption of existing Linux LVM partition

    In a nutshell, what we are going to do in LVM terms:

    1. Add the external disk (/dev/sdb1 in my case) to the VG
    2. Move the PE from the internal disk PV to the external disk PV
    3. Remove the internal disk PV from the VG
    4. Create a LUKS encrypted container in the internal disk, a PV in it, and add the created PV to the VG
    5. Move the PE from the external disk PV to the internal disk PV
    6. Remove the external disk PV from the VG
    7. Configure the bootloader to access the encrypted PV

    In the following sections, we are going to describe every step in detail.

    1. Add the external disk (/dev/sdb1 in my case) to the volume group

    Let’s create a physical volume in the external disk and add it to the volume group (in my case this is called ‘system’):

    # pvcreate /dev/sdb1
    # vgextend system /dev/sdb1
    
    We did not lvresize the two LVs, so they kept the same size. Our data is still in /dev/sda5

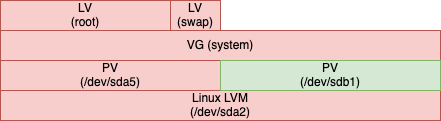
    2. Move the physical extents from the internal disk physical volume to the external physical volume

    This is a time-consuming operation: we will transfer all the physical extents from the internal disk physical volume to the external disk physical volume:

    # pvmove /dev/sda5 /dev/sdb1
    

    The command will periodically output the percentage of completion.
    The speed of the process depends on multiple factors, overall others: hard disk transfer throughput and size of the data to move.

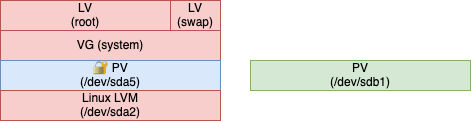
    3. Remove the internal disk physical volume from the volume group

    Now the physical volume in the internal disk is empty: we can remove it from the volume groups and remove the physical volume from it:

    # vgreduce system /dev/sda5
    # pvremove /dev/sda5
    

    Now our data is all on the /dev/sdb1 (external disk) PV

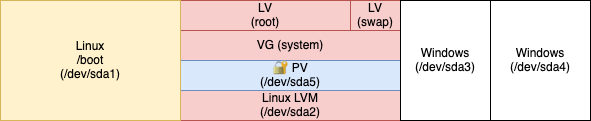
    4. Create a LUKS encrypted container in the internal disk, a physical volume in it, and add the created physical volume to the volume group

    Our data is completely stored on the physical volume that is in the external disk: we are halfway through.

    Let’s wipe the internal disk partition that was holding our unencrypted data:

    # cryptsetup open --type plain /dev/sda5 container --key-file /dev/urandom
    

    Now we need to create an encrypted LUKS container to hold the new internal disk PV.
    Different options can be selected, depending on the distribution you are running, the bootloader, and the version of cryptsetup you are using (e.g. LUKS2 works only with cryptsetup ≥ 2.1.0).

    I choose:

    • XTS cipher
    • 512 bits key size
    • LUKS1 (so I can remove the separate /boot partition later)

    A password will be asked (do not lose it):

    # cryptsetup -v --verify-passphrase -s 512 luksFormat /dev/sda5
    

    This password will be used for every subsequent mounting of the root volume (e.g. on boot, so choose carefully).

    Let’s now create a physical volume into the container and then add the physical volume to the volume group:

    # cryptsetup luksOpen /dev/sda5 dm_crypt-1
    # pvcreate /dev/mapper/dm_crypt-1
    # vgextend system /dev/mapper/dm_crypt-1
    

    5. Move the physical extents from the external disk physical volume to the internal disk physical volume

    We are now going to reverse the direction of the data flow: the physical volume in the internal disk is now ready to hold our data again.
    Let’s move the physical extents from the external disk PV to the internal disk physical volume. Again, this is a time-consuming operation that depends on the same factors outlined above:

    # pvmove /dev/sdb1 /dev/mapper/dm_crypt-1
    

    As stated before, the command will periodically output the percentage of completion.

    6. Remove the external disk physical volume from the volume group

    Our data is now entirely on the internal disk physical volume (this time encrypted, though). We need to remove the external disk physical volume from the volume group and remove the physical volume on it:

    # vgreduce system /dev/sdb1
    # pvremove /dev/sdb1
    

    Success! Our data is safely encrypted in the LUKS encrypted /dev/sda5 (internal disk) PV

    It is considered good practice to completely wipe /dev/sdb1 now, as it was containing our unencrypted data.

    7. Configure the bootloader to access the encrypted physical volume

    The final step is to inform the bootloader that the root file-system is now on an encrypted partition.
    Depending on your distribution, there are different ways to inform the bootloader.

    My distribution of choice (openSUSE) features GNU GRUB and initrd. In this case, the specific instructions are:

    • Create /etc/crypttab and insert the name of the encrypted LUKS container with the UUID of the partition on the disk (check which one with ls /dev/disk-by-uuid):
    # ls -l /dev/disk/by-uuid/ | grep sda5
    lrwxrwxrwx 1 root root 10 Nov 13 21:27 45a4cbf0-da55-443f-9f2d-70752b16de8d -> ../../sda5
    # echo "dm_crypt-1 UUID=45a4cbf0-da55-443f-9f2d-70752b16de8d" > /etc/crypttab
    
    • Regenerate initrd with:
    # mkinitrd
    • Reinstall GRUB with:
    grub2-mkconfig -o /boot/grub2/grub.cfg && grub2-install /dev/sda
    

    Success! /boot is still unencrypted, though.

    initrd will now ask at every boot the same password you used to create the LUKS container.

    Right now our root volume is encrypted, except for /boot which is left unencrypted. Leaving /boot unencrypted brings some benefits:

    • Unattended LUKS unlock via keyfile (stored, for example, in a USB key)
    • LUKS unlock via the network (authenticate via SSH to provide the LUKS password as implemented in dropbear-initramfs)

    One big drawback: having /boot unencrypted is vulnerable to the evil maid attack. But simple remediation can be put in place: let’s discover it in the next section.

    Optional: remove the separate /boot partition and achieve full disk encryption (FDE)

    Depending on your security model, on the bootloader you are using, on the LUKS version your container is using, it might be more secure to make /boot part of the encrypted volume.
    In my case, I decided that I wanted full disk encryption so I moved /boot into the encrypted volume.

    The idea here is to:

    • Create a copy of /boot into the LVM volume
    # cp -rav /boot /boot-new
    # unmount /boot
    # mv /boot /boot.old
    # mv /boot-new /boot
    
    • Remove the /boot partition from /etc/fstab:
    # grep -v /boot /etc/fstab > /etc/fstab.new && mv /etc/fstab.new /etc/fstab
    • Modify GRUB to load the boot loader from an encrypted partition:
    # echo "GRUB_ENABLE_CRYPTODISK=y" >>/etc/default/grub
      • Provision a keyfile to avoid typing the unlocking password twice.
        We are now in a particular situation: GRUB needs a password to unlock the second stage of the bootloader (we just enabled it). After the initrd has loaded, it needs the same password to mount the root device.

        To avoid typing the password twice, there is a handy explanation in the openSUSE Wiki: avoid typing the passphrase twice with full disk encryption.
        Be sure to follow all the steps.

      • Install the new bootloader:
    # grub2-mkconfig -o /boot/grub2/grub.cfg && grub2-install /dev/sda
    Full disk encryption: mission accomplished!

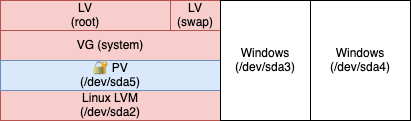
    Everything now is in place: all the data is encrypted at rest.
    Only one password will be asked: the password that you used to create the LUKS container. GRUB will ask it every time you boot the system, while initrd will use the keyfile and will not ask for it.

  • Scaling to 100k Users | Alex Pareto

    Many startups have been there – what feels like legions of new users are signing up for accounts every day and the engineering team is scrambling to keep things running.

    This is a good introductory post on architecture scaling. Definitely an interesting read that presents the concept behind scaling in a short, comprehensive, and meaningful way.

    Source: Scaling to 100k Users | Alex Pareto

  • How a Terraform + Salt + Kubernetes GitOps infrastructure enabled a zero downtime hosting provider switch

    The switch

    It has been a busy weekend: I switched the hosting provider of my whole cloud infrastructure from DigitalOcean to Hetzner.
    If you are reading this it means that the switch is completed and you are being served by the Hetzner cloud.

    The interesting fact about the switch is that I managed to complete the transition from one hosting provider to another with zero downtime.

    The Phoenix Server

    One of the underlying pillars that contributed to this success story is the concept of Phoenix Server. In other words, at any moment in time, I could recreate the whole infrastructure in an automated way.

    How?

    • The resource infrastructure definition is declared using Terraform. By harnessing the Terraform Hetzner provider, I could simply terraform apply my infrastructure up.
    • The configuration definition is powered and makes use of Salt, versioned in Git.

    At some point in time, I made the big effort of translating all the configurations, the tweakings and the personalization I made to every part of the infrastructure and prepare a repository of Salt states that I kept updated.

    Two notable examples: I am picky about fail2ban and ssh.

    The result is that, after provisioning the infrastructure, I could configure every server exactly how I want it by simply applying the Salt highstate.

    • The application stack relies on containers: every application runs in its container to be portable and scalable. The orchestration is delegated to Kubernetes.

    After all the steps above were applied and I have an identical infrastructure running on Hetzner, the old infrastructure was still working and serving the users.

    DNS switching

    At this point, I had just prepared a specular environment running in Hetzner cloud. But this environment was not serving any client.

    Why?
    Let’s consider an example to explain the next step.

    This website, www.michelebologna.net, is one of the services running by the infrastructure.
    Each user was still resolving www.michelebologna.net using the old address: the old infrastructure was still serving it.

    To test the new infrastructure, I fiddled with my /etc/hosts and pointed www.michelebologna.net to the new reverse proxy IP (Note: this is required to bypass the load balancers): I verified it was working and that meant I was ready for the switch.

    The switch happened at the DNS level: I simply changed the CNAME for the www record from the old reverse proxy to the new one. Thanks to the proper naming scheme for servers I have been using, the switch was effortless.
    After the switch, I quickly opened a tail in the logs of the reverse proxy: as soon as the upstream DNSes were updating the record, users were accessing the website via Hetzner, success!

    Trivia: after 5.5 years, the old reverse proxy was shut down. In memory of it, its uptime records with an astonishing availability at 99.954%!

         #               Uptime | System                
    ----------------------------+-----------------------
         1   112 days, 18:33:34 | Linux 4.4.0-tuned
         2   104 days, 21:00:22 | Linux 4.15.0-generic
         3    85 days, 19:08:32 | Linux 3.13.0-generic
         4    78 days, 19:04:49 | Linux 4.4.0-tuned
         5    71 days, 13:01:09 | Linux 4.13.0-lowlaten
         6    66 days, 04:42:44 | Linux 4.15.0-generic
         7    62 days, 15:49:14 | Linux 3.19.0-generic
         8    62 days, 00:52:09 | Linux 4.15.0-generic
         9    56 days, 22:21:20 | Linux 3.19.0-generic
        10    53 days, 16:34:11 | Linux 4.2.0-highmem
    ----------------------------+-----------------------
        up  1989 days, 03:46:34 | since Tue Oct 28 14:28:05 2014
      down     0 days, 22:00:33 | since Tue Oct 28 14:28:05 2014
       %up               99.954 | since Tue Oct 28 14:28:05 2014
    

    After updating the DNS records for all other services, I was still checking if any service was still being accessed using the old infrastructure. After some days with minimal activity in the old infrastructure, I decided to destroy the old infrastructure.

    Caveats with DNS

    There are some things that I learned while doing these kinds of transitions. Or maybe, that I learned last time but I did not write down, and I am using this space as a reminder for the next time.

    • A DNS wildcard record (*.michelebologna.net) that gets resolved to a hostname (a catch-all record) can generate weird results if you are running a machine that has search michelebologna.net in its resolv.conf
    • Good hosting providers offer the ability to set a reverse DNS for every floating or static IP address for every cloud instance. A reverse DNS must reflect the mail server hostname (in Postfix)
    • With email hosting, set up DKIM and publish SPF, DKIM, and DMARC records in the DNS
    • The root record (@) must not be a CNAME record, but it must be an A/AAAA record
  • TLS-terminated Bitlbee with custom protocols

    Five years ago I started a small GitHub project aimed to run Bitlbee seamlessly in a container.

    Why Bitlbee?

    Back in the day, I was relying heavily on IRC for my daily communications and the plethora of other protocols that were starting to get traction was too much: I wanted to have a bridge between my IRC client and the other protocols to be able to communicate only by using my IRC client without installing any resource consuming monster (enough said).

    Bitlbee was and still is the perfect tool to implement that bridge: every protocol is consumable via IRC, provided that a Bitlbee server has been set up and a bridge between Bitlbee and the protocol is available and installed into the Bitlbee server.

    I decided to roll my server of Bitlbee running in a Docker container, and I decided to integrate into the build a list of custom protocols that were available as plugins for Bitlbee. By packaging everything into a container, running a ready to use Bitlbee server with custom protocols was only a docker pull away.

    The container, called docker-bitlbee and published to Docker Hub, started to get traction (who wants to compile all the plugins nowadays?) and in 2018 I reached 100k downloads on Docker Hub.
    It is also the first result for the SERP “docker bitlbee” on DuckDuckGo and Google.

    With time, contributors started to submit pull requests to enable new custom protocols, reporting problems and asking for new features.

    Now the container has been downloaded more than 500k times on Docker Hub and I am still using it in my infrastructure to access some protocols over IRC (a notable example: Gitter).

    The latest feature that I just added, based on a user request, is TLS termination to Bitlbee via stunnel. There has been some constructive discussion, and I am glad that the community is supportive and confrontational.

    So far, I am very proud of the work that contributed to this side project.

  • PSA: this website honors your browser preferred color scheme (light/dark theme)

    The latest tech trend is to enable dark themes among all applications and devices: as the passionate tweaker I am, I set up every device and application I use to harness a light theme during daylight and dark mode at all other times.

    Whenever a light (or dark) theme is applied system-wide, most of the browsers read that value and communicate with the browsed website what is the preferred color scheme: light or dark. The website, if knows the two variants, can answer with CSS rules that are tweaked for light or dark via the prefers-color-scheme CSS media rule.

    Until today, this website only offered a light variant. After an evening spent with Firefox Web Developer Tools, a color picker tool and somebody that knows color theory better than me, I enabled the dark variant for this website.

    In other words: if your browser supports light and dark color schemes, you will experience this website using your preferred theme.
    In case your browser does not provide a preferred color scheme, the default (light variant) will be used.

    Dear reader, please let me know if you spot something that is not in the right place (especially in the dark variant).

    Michele Bologna dark variant theme
    Michele Bologna dark variant theme

    Under the hood

    For you techies out there, to roll out your dark variant for your website, you need:

    1. Good taste in style and colors (might be subjective)
    2. CSS and prefers-color-scheme directive

    All the CSS rules specific to the dark variant will be delimited by the prefers-color-scheme: dark selector in this way:

    @media (prefers-color-scheme: dark) {
    [...]
    a, .site-info > a {
    color: #33C9FF;
    [...]
    

    If you are using WordPress, a good starting point is Adding Dark Mode Styles (CSS) To A WordPress Theme.

    Happy tweaking!

  • How I stay on top and process my professional email with IMAP Flags, Sieve and Thunderbird

    At my current job, I am lucky enough to choose which mail user agent I can run to process my professional email: after a lot of experiments, I decided to stick with Thunderbird, because it is open source and it can be heavily customized. It seems, though, that I am not the only one to enjoy Thunderbird.

    How does my normal day-to-day inbox look?

    This is what I see when I open Thunderbird. Do you feel underwhelmed by the unread inbox count? Fear not.

    The workflow

    Yeah, I agree, 242 unread items in inbox might be scaring. But I am using a consolidated workflow to process all these unread emails in my inbox in a very short time.

    The keys to everything are the rules I defined for my processing and the message list: these two elements can allow me, just by peeking at the screen, to understand what a particular group of messages is about (the topic) and the recipient (directly me, am I in CC or it is a mailing list message?). In this post, I am going to illustrate my workflow to process all these emails in a jiffy.

    Rules

    Let’s start with some ground rules:

    • Never touch a mail twice: when opening a mail, it gets either:
      • Archived (or deleted)
      • Moved to the waiting for folder
      • Triggers an action (reply, forward)
        No other action is contemplated or allowed. Never return twice to an already processed email.
    • Every email generated by a human cannot be automatically filtered and archived to a folder
    • Every unfiltered email must land in inbox (that where everything untouched and needing at least a read must land, right?)
    • Important emails (the ones I am the direct recipient) needs the highest priority and must be processed first
    • Mobile processing is allowed and encouraged

    Thunderbird message list

    The second pillar is the Thunderbird message list. As you can see, I tweaked the columns and sorted them in a different order to show:

    • Whether the mail is starred
    • The sender
    • The subject
    • The number of emails grouped for that thread
    • Date/time

    The idea

    The idea is to write server-side filters to automatically:

    • Archive or delete emails that are automatically generated and I want to keep for future reference (build or test logs) or that I am not interested in (spam)
    • Flags/tags every email based on the recipient:
      • If I am the recipient make them stand from the crowd
      • If it is a mailing list message or related to a particular project (e.g. the projects I am directly involved with), group them with a flag

    By configuring Thunderbird appropriately, whenever a message has a particular flag, the flag is displayed using a specified color.

    IMAP flag and filters

    The concept of a flag is an IMAP feature and luckily again, the IMAP server I am using supports user-defined IMAP flags.
    The next step is to write server-side filters: the server I am using supports filters written in Sieve.
    An example of a filter that applies a flag if the message is a mailing list message:

    # rule:[uyuni]
    if anyof (header :is "x-mailinglist" "uyuni-devel", header :is "x-mailinglist" "uyuni-users", header :is "x-mailinglist" "uyuni-announce")
    {
    addflag "$label5";
    stop;
    }
    

    In this case, if the message comes from the Uyuni project mailing list, it gets the flag label 5 applied.
    The connection between an IMAP flag and a Thunderbird showing it with color is defined in the Thunderbird configuration.

    How can a message in which I am the recipient (or it is not caught by one of the previous filters) stand out from the crowd?
    The last filter in my chain is exactly a catch-all filter that applies the “unfiltered-email” flag:

    # rule:[unfiltered-emails-tagging]
    if true
    {
    addflag "\\Flagged";
    addflag "$label6";
    stop;
    }
    

    The attentive reader notices that a standard \\Flagged flag is also set for the messages that are caught by this filter. Why is this needed?

    My mobile email client does not support user-defined IMAP flags (I do not have the same colorful message list as I have it in Thunderbird). To overcome this limitation and still separate important messages (the unfiltered ones) from the rest, I added the \\Flagged flag (which normally gets rendered as a starred or flagged message) to these messages.
    The result is that unfiltered messages have a star near associated with them. That is visually acceptable on mobile and Thunderbird as well (in addition to the user-defined colored flag).

    Thunderbird and flags

    Thunderbird does not still know which color associate with an IMAP flag. Let’s define one.

    1. Open Thunderbird settings and fire up the Config Editor in the Advanced Settings.
      Define the following new String keys:

      1. name: mailnews.tags.$label0.color
      2. key: #000000
      3. name: mailnews.tags.$label0.tag
      4. key: my-first-tag
        Each new flag/label will have its own incremental $label.
    2. Restart Thunderbird
    3. In Thunderbird settings > Display > Settings you can customize the color of each tag

    Done! If Sieve is doing its job and Thunderbird is correctly reading the tags, you will have each tagged message colored.

    The workflow

    Now that the setup is in place, here is how I process my inbox daily with a focused approach:

    1. Show only the important and urgent emails: in other words, show only the emails that are directly directed to me (I am the recipient). I have a complex set of Sieve filters that try to catch every email that is not in this category, so I can use the last filter (the “unfiltered” ones) as a fallback.
      In Thunderbird, it is enough to select the associated tag (unfiltered-email) or, equivalently, show only starred messages.
      Show only the starred messages (or the ones tagged with “unfiltered-email”)

      With the mobile client, only the latter is applicable (for the reasons expressed above): show only the starred/flagged ones.
      The next step is to process every email by adhering to the rules and principles described above.
    2. When all important and urgent emails category is empty, it is time to process all other messages. Based on a quick look I have at the message list (and its coloring), I can decide to show a combination of tags and show only the messages that have all the tags, or any of them, or a combination of the two.
      Thunderbird offers a very customizable tag filter when showing the message list:
      Thunderbird capabilities of selecting a set of filters are impressive

      Let’s decide I want to focus, for example, on the uyuni-or-spacewalk filter and show only messages tagged as such:
      Showing only the messages that are tagged with `uyuni-or-spacewalk` tag.
      Hey, this is a public mailing list, I only have to redact the names!

      With this filtered view I am free to focus just on the messages shown and have a quick glimpse of what are the major topics in this particular area.

    Troubleshooting

    If you want to check which user-defined flags your IMAP server supports, there is a handy Ruby script I found.

    The verdict

    I am proud of my current setup; it is the result of several months of experimenting, switching tools, tweakings, rollbacks, and commitments.
    By taking ownership of my inbox I can stay on top of everything that is happening and, thanks to the filtering and tagging, I can set my priorities and tailor my email client to show what I am focusing on. I make my email client work for me, not the other way around.
    Besides, providing a timely and precise answer to any email that requires that action has been a breeze.
    The only thing I want to improve is to find a mobile email client that can read IMAP tags and allows me to process other tags while reading emails from mobile.

    How do you manage to stay on top of your professional email? Do you use any particular mechanism like auto-tagging and Thunderbird?

  • Startup order in Docker containers

    Startup order in Docker containers

    Motivation

    I recently dealt with an application that is comprised of multiple services running in containers. Even though every part of this application is correctly split into each separated microservice, the independence of each service is not enforced.
    This lack of independence has several drawbacks, one of which is that containers must be started by following a pre-defined startup order. Otherwise, some containers might be terminated due to an application error (the application breaks when an unexpected error occurs, e.g. it is relying on another linked service that is not ready to accept the connection).

    Not all applications suffer from this kind of problem: the application I was dealing with was not born with microservices in mind, but it was rather split and converted to separate containers across its lifetime. But it is not the only application that has this particular limit, for sure other applications out there are converted into a Franken-microservice-stein “monster”.

    Workarounds

    I am going to explore what are the possible workarounds to define and follow a startup order when launching containerized applications that span across multiple containers.

    Depending on the scenario, it is possible that we do not want (or we cannot) change the containers and the application itself: there are multiple reasons behind these factors, namely:

    • the complexity of the application
    • whether the sources are available
    • if changes to the Dockerfiles are possible (especially ENTRYPOINTs)
    • the time required to change the architecture of the application

    docker-compose and healthcheck

    Using docker-compose, we can specify:

    • a healthcheck: it specifies what is the test (command) to check if the container is working. The test is executed at intervals (interval) and retried retries times:
    db:
      image: my-db-image
      container_name: db-management
      ports:
        - 31337:31337
      healthcheck:
        test: ["CMD", "curl", "-fk", "https://localhost:31337"]
        interval: 300s
        timeout: 400s
        retries: 10
    
    • a depends_on field to describe to start the container after the dependency has been started and a restart_on_failure:
    web:
      image: my-web-image
      restart: on-failure
      depends_on:
        - db
      links:
        - db
    

    What is happening here?

    • docker-compose starts the service and starts the db container first (the web one depends on it)
    • the web container is started shortly after (it does not wait for db to be ready, because it does not know what “ready” means for us). Until the db container is ready to accept connections, the web container will be restarted (restart: on-failure).
    • the db service is marked as healthy as soon as curl -fk https://localhost:31337 returns 0 (the db-management image ships with an HTTP controller, and it returns 0 only when the database is ready to accept the connections). Marking the service is healthy means that service is working as expected (because the test is returning what we are expecting). When the service is no longer healthy, the container must be restarted and other policies and actions might be introduced.

    NOTE: in docker-compose reference < 3, depends_on could also wait for the health checks, but starting from docker-compose reference specification version 3, depends_on can only accept other services as parameters in docker-compose.

    This solution is not ideal, as the web container is restarted until the dependency is satisfied: that can be a huge problem if we are using that container for running tests, as a container exiting because of failure can be assimilated as failed tests.

    wait-for-it wrapper script

    This approach is slightly better than the previous, but it is still a workaround. We are going to use docker-compose and the wait-for-it script.
    In the docker-compose.yml file we insert a depends_on (as described in the previous section) and a command:

    db:
     container_name: db-management
      ports:
        - 31337:31337
      healthcheck:
        test: ["CMD", "curl", "-fk", "https://localhost:31337"]
        interval: 300s
        timeout: 400s
        retries: 10
    
    web:
      image: my-web-image
      depends_on:
        - db
      links:
        - db
      command: ["./wait-for-it.sh", "db:31337", "--", "./webapp"]
    

    The wait-for-it script waits for host:port to be open (TCP only). Again, this does not guarantee that the application is ready to serve but, compared to the previous workaround, we are not restarting the web container until its dependency is ready.
    One drawback of this workaround is that it is invasive: it requires the container image to be rebuilt by adding the wait-for-it script (you can use a multi-stage build to do so).

    Re-architect the application

    This is not a workaround but it is rather the solution, and the best one we can achieve. It takes effort and it might cost a lot: the application architecture needs to be modified to make it resilient against failures. There are no general guidelines on how to successfully re-architect an application to be failproof and microservice ready, even though I strongly suggest to follow the 12 guidelines expressed in the 12-factor applications website.

  • On servers timezone and tmux

    A while ago I was fighting with a timezone set on a server because of the daylight saving time kicked in: during the ghost hour I had troubles with finding automated jobs. Moreover, the server was located overseas and depending on when I was checking the remote date and time, I could get a different time delta.

    Then, the quasi-philosophical question about “which timezone should be set for a remote server: my timezone or local timezone to the server?” has began rolling in my mind.

    After some research, I found a piece of technical advice from Yeller. In short, their advice can be summarized with:

    Use UTC
    Use UTC. Use UTC. Use UTC. Use UTC. Use UTC. Use UTC. Use UTC. Use UTC. Use UTC. Use UTC. Use UTC. Use UTC. Use UTC. Use UTC.

    (no, really check the linked post: it is full of good and agreeable technical points to use UTC).

    After setting the default timezone for all my servers to UTC, there are some tweaks to live happily ever after with UTC.

    First, add your timezone and export it into the TZ variable:

    echo 'export TZ=/usr/share/zoneinfo/Europe/Rome' >> ~/.zshrc

    This brings a notable advantages:

    • without TZ set:

    % date
    Mon Mar 25 20:56:43 2019
    journalctl -f
    [...]
    Mar 25 20:57:51 golf systemd-logind[1154]: Session 980 logged out. Waiting for processes to exit.

    • with TZ set you get every message* localized in the selected timezone:

    % date
    Mon Mar 25 21:57:53 CET 2019
    journalctl -f
    [...]
    Mar 25 21:57:51 golf systemd-logind[1154]: Session 980 logged out. Waiting for processes to exit.

    * = every message from a sane and decently written program that knows about timezones and honors the TZ variable.

    Secondly, I usually have everything running in a tmux session with the time in the tab bar. After changing the server timezone to UTC, tmux was outputting the time in UTC: I wanted to show my local time as well. In order to show localized time, you have to change some parameters:

    • Output the time and the timezone in the tab bar:

    In ~/.tmux.conf:
    set -g status-right '%a %b %d %H:%M %Z'

    • Make sure to send your TZ variable whenever you are using SSH:

    In ~/.ssh/config:
    Host *
    [...]
    SendEnv TZ

    • Make sure that your SSH server automatically accepts the TZ variable:

    In /etc/ssh/sshd_config
    AcceptEnv [...] TZ

    Restart your sshd service and try to login in the remote server. Your tmux tab bar should show the updated time in your localized timezone, while still using UTC as the global timezone for the server.

  • Automatic (or unattended) upgrades in openSUSE, CentOS and Fedora, Debian and Ubuntu

    Each one of us is a system administrator: for at least your workstation (or notebook) you can decide when and how to administrate it. In the special case in which you are being elected to administer servers too, the matter becomes thorny: what is the workflow in terms of patching, time of reaction to security issues and, in general, when and how to install updates?

    Some distributions offer the concept of automatic (or unattended) upgrades: install automatically a subset (or all) the available updates via the package manager. This particular subset can be specified by the system administrator, a notable example would be the subset of security updates.

    The approach is, of course, debatable: should you use it for a critical server? What happens if the upgrade goes south? Would this approach scale?

    The answer is, nevertheless, debatable: it depends. You are not required to use automatic updates, but installing security patches automatically might make sense in some non-mission-critical situations. You can read an opinionated list of reasons to use automatic updates, as well as an equally opinionated list of reasons NOT to use automatic updates.

    In this post, I am going to present the three approaches for automatic updates offered in:

    • openSUSE
    • CentOS and Fedora
    • Debian and Ubuntu

    and how I setup them for my own “very special, do not try this at home” situation, which means that servers always install only security updates automatically.

    openSUSE

    openSUSE can schedule automatic updates via Automatic Online Update.

    Take a look at the documentation: everything is already well documented, you just need to the package with:

    # zypper install yast2-online-update-configuration

    and then, to configure it:

    # yast2 online_update_configuration

    The servers must weekly check and install only security updates automatically (category “Security”), except the ones declared as “Interactive”. From the documentation:

    Sometimes patches may require the attention of the administrator, for example when restarting critical services. For example, this might be an update for Docker Open Source Engine that requires all containers to be restarted. Before these patches are installed, the user is informed about the consequences and is asked to confirm the installation of the patch. Such patches are called “Interactive Patches”.
    When installing patches automatically, it is assumed that you have accepted the installation of interactive patches. If you rather prefer to review these patches before they get installed, select Skip Interactive Patches. In this case, interactive patches will be skipped during automated patching. Make sure to periodically run a manual online update, to check whether interactive patches are waiting to be installed.

    Skipping interactive patches absolutely makes sense to me, as well as using delta RPMs (to save bandwidth), auto-agreeing with licensing and including recommended packages.

    Update: Richard reminded me that if you are running Leap or Tumbleweed with transactional updates, you can take advantage of automatic transactional updates; rebootmgr will take care of automatically reboot the machine in case any transactional updates were installed.

    CentOS version <= 7

    The package that enables automatic updates is called yum-cron. To install it:

    # yum -y install yum-cron

    The configuration file (/etc/yum/yum-cron.conf) is self-documenting: just open it in an editor and begin tweaking. In my case, to check and install only security updates I just changed the following two lines:

    update_cmd = security
    apply_updates = yes

    Finally, make sure that the corresponding service is enabled:

    # systemctl start yum-cron.service

    Fedora and CentOS version >= 8

    Fedora automatic updates are enabled by installing the dnf-automatic package:

    # dnf install -y dnf-automatic

    As with CentOS, I just changed the configuration file (/etc/dnf/automatic.conf) to install security updates only:

    upgrade_type = security

    After the configuration, start the service:

    # systemctl enable --now dnf-automatic.timer

    Debian and Ubuntu

    Debian and Ubuntu make use of the unattended-upgrades package in order to enable automatic updates. Let’s begin with installing it:

    # apt install unattended-upgrades

    It is configuration time: make sure to enable the update of package lists and perform the upgrade in /etc/apt/apt.conf.d/20auto-upgrades:

    APT::Periodic::Update-Package-Lists "1";
    APT::Periodic::Unattended-Upgrade "1";

    Now enable the repository from which updates can be installed in /etc/apt/apt.conf.d/50unattended-upgrades; in our case, only the security repository:

    Unattended-Upgrade::Origins-Pattern {
            "origin=Debian,codename=${distro_codename},label=Debian-Security";
    };

    Conclusions

    Every distribution offers then its own tweaks (like email notifications when updates are ready and when are installed), package exclusions based on package names, install updates at shutdown time and whatnot: be sure to read the documentation! The examples are just a starting point.

    Happy automatic patching!

  • La mia esperienza con SPID e Poste Italiane

    Questa settimana ho deciso di attivare lo SPID (Sistema Pubblico di Identità Digitale).

    Cosa è lo SPID

    L’identità digitale SPID è rappresentata da un username e una password che vi permettono di autenticarvi sui siti della Pubblica Amministrazione (PA). I suoi usi sono molteplici e sta prendendo sempre più piede per le comunicazioni online tra cittadino e PA.

    Cosa serve per ottenere le credenziali SPID

    I requisiti per fare domanda per lo SPID sono, per i cittadini italiani:

    • Essere maggiorenni
    • Indirizzo email
    • Numero di telefono cellulare abilitato alla ricezione SMS
    • Documento di identità
    • Tessera sanitaria

    La documentazione ufficiale si trova sul sito governativo di SPID.

    I providers

    Sul sito governativo di SPID, si trova anche (a fine pagina) la lista dei provider che offrono la possibilità di ottenere un’identità SPID, con una serie di funzionalità offerte (o meno) che caratterizzano ogni provider.

    La scelta del provider SPID è importante: a seconda del provider scelto si devono sostenere dei costi; sempre a seconda del provider, la fase di identificazione varia: da remoto oppure di persona.

    Un passo indietro: la fase di identificazione

    Una volta scelto un provider ed essersi registrati sul sito dello stesso per l’ottenimento delle credenziali SPID, è necessaria una fase di identificazione in cui il provider attesta che chi fa richiesta di SPID sia effettivamente la persona in questione. Questa fase è svolta da un umano e può essere svolta di persona [vi recate in un’agenzia del provider scelto oppure a domicilio] oppure da remoto [via webcam].

    La scelta del provider

    Facendo un po’ di ricerche online, la mia selezione tra i provider disponibili ha portato alla seguente shortlist:

    • Poste Italiane [identificazione di persona]
    • Sielte [identificazione remota]
    • TIM [identificazione remota]

    In un momento di ricerca successivo, ho deciso di scegliere Poste Italiane [PosteID] per:

    • condizioni contrattuali
    • politica di gestione dei dati personali
    • supporto a SPID3 [SPID offre tre livelli di sicurezza, e solo alcuni provider supportano fino al terzo livello]

    NOTA: come si dice in gergo, your mileage may vary: alcuni provider offrono anche autenticazione remota tramite smart card o altri meccanismi di autenticazione. Il provider che ho scelto io potrebbe non essere l’opzione più conveniente per chi legge.

    La mia esperienza con Poste Italiane: più che positiva

    Mi sono registrato sul sito di Poste Italiane [PosteID], ho letto le condizioni contrattuali e ho fornito una copia dei miei documenti. Seguendo le istruzioni ho prenotato un appuntamento per il giorno successivo presso un’agenzia di Poste Italiane.

    Arrivato in agenzia, ho fatto la scansione del QR code fornito per l’appuntamento all’apposito totem; dopo 30 secondi, sono stato servito. L’impiegato ha verificato i miei documenti e che fossi il titolare della domanda di SPID. Nessun problema riscontrato.

    Una volta che la mia domanda è stata accolta, la mia identità SPID è diventata subito attiva. Ho colto l’occasione per provarla sul sito di Poste e su quello della Regione Lombardia.

    Esperienza più che positiva.